Installation of Web Client
This page explains how to prepare Windows for the VisualCron Web Client, how to install the Web Client from the Client or manually in IIS, and how to fix common installation problems. To learn what the Web Client does, see VisualCron Web Client.
Requirements
- A Windows version that VisualCron supports, with .NET Framework 4.8 (see Requirements)
- VisualCron installed on the computer that hosts the Web Client, normally the Server computer
- Microsoft IIS, or IIS Express 8.0 or later, on that computer
- For IIS, the ASP.NET 4.x role service (see Prepare Windows)
- Administrator rights on that computer
- A local connection from the Client to the Server, to install the Web Client from the Client
Prepare Windows
Before you install the Web Client in IIS, install IIS with ASP.NET:
- On Windows Server, add the Web Server (IIS) role in Server Manager -> Manage -> Add Roles and Features. Under Application Development, select the ASP.NET 4.x role service. Its version number depends on your Windows version.
- On desktop Windows, open Turn Windows features on or off and turn on Internet Information Services with its ASP.NET 4.x feature.
If users will log on to the Web Client with Windows authentication, also install the Windows Authentication role service, under Security.
Install the Web Client from the Client
The Web Client runs as a website named "VisualCronWebClient" in IIS or IIS Express. You install it from the Web Client tab of the Server settings. The tab checks the web servers on the computer where the Client runs, so run the Client on the Server computer and connect to the Server locally. If IIS is already installed on the computer, use IIS.
To install the Web Client from the Client:
- If you use IIS, prepare Windows first (see Prepare Windows).
- Right-click "VisualCronClient.exe" in the VisualCron installation folder (by default "C:\Program Files (x86)\VisualCron") and select Run as administrator.
- Connect to the local Server.
- Go to Server -> Main settings -> Settings -> Web Client tab.
- Wait until the IIS and IIS Express boxes become available. The Client checks the installed web servers first.
- In the box for your web server, enter the Port. The default is "9000".
- Click Install. When the installation is done, VisualCron shows "Installed!".
- Click the Link to open the Web Client in your browser.
- In the Web Client, click Manage servers, add a server connection to the Server, and connect with a VisualCron user name and password, the same users as in the Client (see Main - User Permissions). To log on with Windows accounts instead, see Enable Windows Authentication / Active Directory Logon.
If IIS Express 8.0 or later is not installed when you click Install in the IIS Express box, VisualCron tries to install it. If it cannot, it shows a message. In some cases the message offers to open the IIS Express download page: click OK to open it in your browser, install IIS Express, and then click Install again. In the IIS box, VisualCron likewise tries to install IIS when it is not installed, so install IIS with ASP.NET yourself first (see Prepare Windows).
Server -> Main settings -> Settings -> Web Client tab
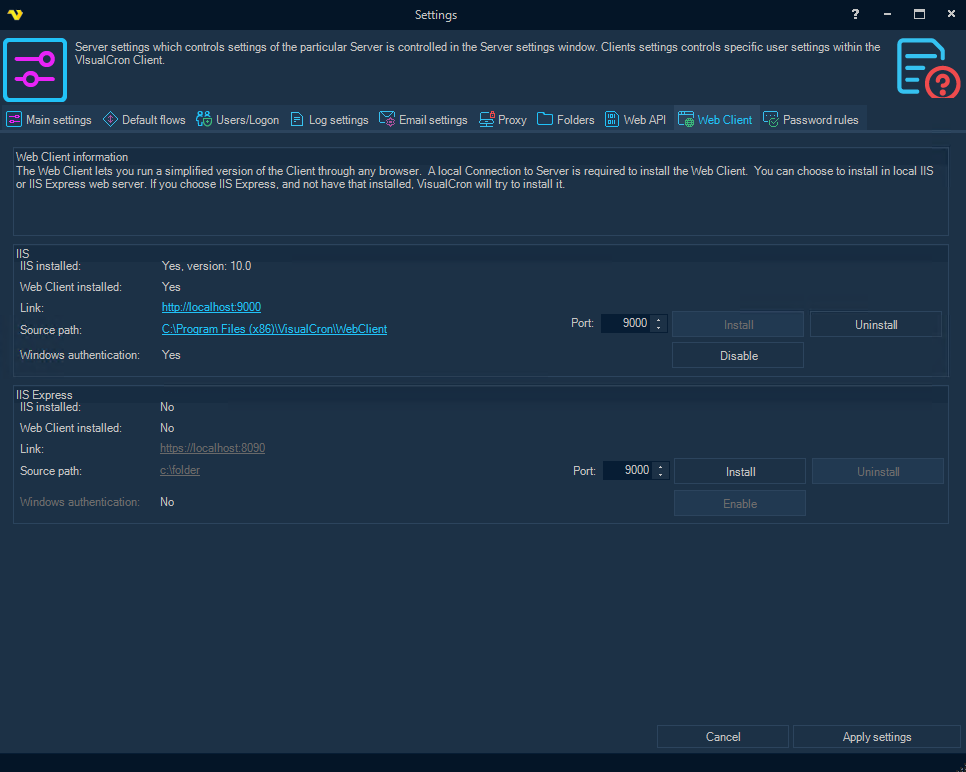
Fields and buttons on the Web Client tab
The IIS box and the IIS Express box show:
- IIS installed: whether that web server is installed, and its version
- Web Client installed: whether the Web Client is installed in that web server
- Link: the address of the Web Client; click it to open the Web Client in your browser
- Source path: the folder the website runs from, normally the "WebClient" folder in the VisualCron installation folder; click it to open the folder
- Windows authentication: "Yes" or "No"
- Port: the port of the website
| Button | What it does |
|---|---|
| Install | Installs the Web Client in that web server. Unavailable while the Web Client is installed there |
| Uninstall | Removes the Web Client website from that web server and shows "Site deleted". If removing fails, it shows "Site deletion failed" |
| Enable / Disable | Turns Windows authentication on or off for the Web Client website. Available after the Web Client is installed there. See Enable Windows Authentication / Active Directory Logon |
Change the port
You cannot change the port of an installed Web Client on the Web Client tab. Use one of these options:
- For IIS, change the website's binding in IIS Manager
- Click Uninstall, enter the new Port, and click Install again
Install the Web Client manually
You can also create the Web Client website yourself in IIS Manager. VisualCron must be installed on the same computer, because the website runs from the "WebClient" folder of the VisualCron installation. Prepare Windows first (see Prepare Windows).
To install the Web Client manually:
-
Install VisualCron on the computer with the installation type VisualCron Client and Server.
-
Start the VisualCron service (named "VisualCron" in Windows Services) once. At its first start after an installation or upgrade, the service unpacks the Web Client files into the "WebClient" folder of the installation folder. It replaces the contents of that folder, including "web.config", and keeps only the Web Client database, so changes you make to files in that folder are lost at each upgrade.
-
In IIS Manager, add an application pool named "VisualCronWebClientAppPool", with .NET CLR version "v4.0" and the "Integrated" pipeline mode.

-
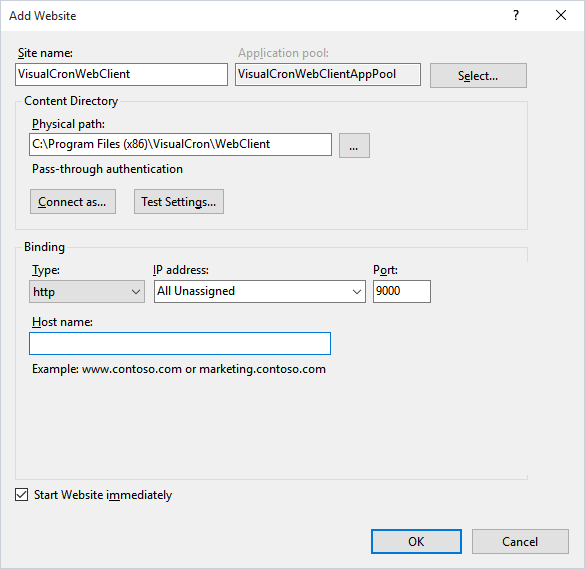
Right-click Sites and select Add Website.
-
Set the site name to "VisualCronWebClient".
-
Select "VisualCronWebClientAppPool" as the application pool.
-
Set the physical path to the "WebClient" folder in the VisualCron installation folder, by default "C:\Program Files (x86)\VisualCron\WebClient".
-
Enter a port. The Client uses "9000" by default.
-
Click OK to save the website.
-
To let users log on with Windows authentication, follow Enable Windows Authentication / Active Directory Logon.
-
In your browser, go to
http://localhost:<port>to open the Web Client.
Install the Web Client on a computer other than the Server
To run the Web Client on a computer other than the Server, complete the following steps:
- Install VisualCron on the IIS computer with the installation type VisualCron Client and Server.
- Install the Web Client there as described in Install the Web Client from the Client.
- In Windows Services, stop the VisualCron service on that computer.
- Set the service's Startup type to Manual.
- In the Web Client, add a server connection to the Server you want to manage. That Server must accept remote connections: Only allow local connections must be cleared (see Settings - Users/Logon), and the Server port must be allowed through Windows Firewall (see Port and firewall).
After you upgrade VisualCron on the IIS computer, start the VisualCron service there once, so that it updates the Web Client files, and then stop it again. Then check in Windows Services that the service's Startup type is still Manual. For a custom installation package, contact VisualCron Support.
Windows authentication
Users can log on to the Web Client with their Windows account when the Server allows Active Directory logon (Allow Active Directory Logon on the Users/Logon tab of Server -> Main settings -> Settings), the users or groups are added in User permissions, and Windows authentication is turned on for the Web Client website. For the full procedure, see Enable Windows Authentication / Active Directory Logon.
Troubleshooting
Installation fails when you click Install
Close the Client. Then right-click "VisualCronClient.exe", select Run as administrator, and try again.
HTTP Error 403.14 - Forbidden
Make sure that IIS has the ASP.NET 4.x role service (see Prepare Windows). Restart the computer if Windows asks you to.
The Web Client does not display correctly
Use Google Chrome or Mozilla Firefox.
Other computers cannot open the Web Client
Check that Windows Firewall on the computer that hosts the Web Client allows incoming connections on the website's port. From another computer, use the host computer's name or IP address instead of "localhost".
Active Directory logon does not work
Check every step in Enable Windows Authentication / Active Directory Logon, in particular the authentication settings of the Web Client website in IIS Manager. Also check the server connection in the Web Client (step 9 of Install the Web Client from the Client).